Wednesday, July 31, 2024

Follow the Bouncing Ball - Chronophotography

Etienne-Jules Marey

I recently discovered the pioneering photographic works of Etienne-Jules Marey, a French scientist who used custom photographic equipment to study motion in a technique called "chronophotography."

"Saut en hauteur, chronophotographie, sujet Schenkel"

Marey took sequential images of objects and bodies in motion, similar to the work of Englishman Eadweard Muybridge (who worked in Palo Alto not far from where I used to live. I even worked at the Letterman Digital Arts Center where a statue of Muybridge stands). Muybridge's work is well known in animation and his extensive studies have been used as animal and human locomotion references for over 100 years.

Marey's photographic gun

Marey built a "photographic gun" capable of taking 12 consecutive photographs in a single second. He used it to study elephants, how cats always land on their feet, and many other subjects.

Connection to the Earliest Computer Games

I don't believe that Marey's work has a direct connection to the earliest computer games, but I did notice striking similarities between his studies of balls in motion and two of the earliest examples of what we might almost call a "video game."

Bouncing Ball Display (1951)

Bouncing Ball Display (Charles Adams and John T. Gilmore Jr., 1951)

"Homme lançant une balle qui rebondit, chronophotographie" (Marey, 1890)

Bouncing Ball Display was a program created for the pioneering Whirlwind I computer built at MIT, the first computer with real-time operation and a dedicated graphical display (and many other "firsts"). Bouncing Ball is one of the earliest examples of computer animation, with a single "dot" bouncing along the "ground" in a series of parabolas in a simulation of motion, gravity, and elastic collisions. There is also an element of interactivity to the program. As can be seen in the time-lapse photo above, there is an apparent hold in the floor. From what have read, the hole can be moved left or right before simulating the ball launch. This made a sort of game where the user would try to set the hole in position to have the ball fall into it, scoring a "basket" (look closely at the repeated attempts captured above and you will see that one run of the sequence had the ball fall into the hole).

Marey's chronophotograph of a man bouncing a ball from 1890 is nearly identical to the photo of the Whirlwind I display.

Tennis for Two (1958)

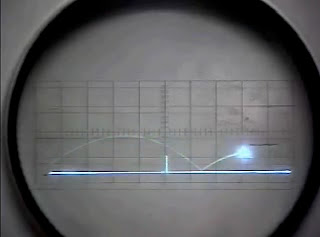
Tennis for Two (Higinbotham, 1958)

"Lancer de balle, chronophotographie" (Marey, 1886)

Tennis for Two, originally called Computer Tennis, was designed by Willy Higinbotham as a public demonstration of the technical instruments used at the Brookhaven National Laboratories where he worked in 1958. He wanted to create something entertaining and inadvertently designed what some regard as the very first video game. In a sort of sideways version of the later hit game Pong, two players use custom controllers to bounce a ball back and forth over a net in a simulated game of tennis. The Donner Model 30 analog computer uses an oscilloscope display to neatly draw the ground plane of the court, the net, and the ball in real-time. A player turn their dial to set their return angle and presses a button to hit the ball. Note that there are no player avatars - not even paddles are displayed on the screen - and no automatic scorekeeping. The game was a hit with the crowd and returned in a later year with a bigger screen, but afterwards was nearly lost to time.

Marey's 1886 image of one man throwing a ball to another is very reminiscent of Tennis for Two, especially with a post in the middle of the image as a stand-in for the tennis net.

Notes used in programming Bouncing Ball Display

Marey was studying the propulsive forces and effect of gravity that create a parabola as the ball arcs through the air. Bouncing Ball and Tennis for Two both use computers (although the Donner 30 is just a toy compared to the Whirlwind) and differential equations to calculate the motion of a ball on the screen. Interestingly, this complex motion with a bouncing ball was not seen in some of the earliest video games of the 1970s. Atari's Pong and the Tennis game on the Magnavox Odyssey both take an overhead (plan) view of the game rather than a side (elevation) view that would require a simulation of gravity. It is likely that the aspect of gravity would be computationally prohibitive for the simple TTL (Pong) and DTL (Odyssey) hardware used to run those games. In addition, it would add complexity to the gameplay for nascent game players at a time when the video game industry was in its infancy.

Wednesday, July 24, 2024

Adding Implied Details of Depth

Taxonomy of Virtual Spaces Part II

I continue to work on my platformer game expansion to my interactive Taxonomy of Virtual Spaces project. This overall project is being created to explore the aesthetics of primary geometry methods used when virtual spaces are projected onto a game screen in different visuo-spatial configurations.

World 1-1 in 3-D doesn't look that different from 2-D

The initial geometry I created for my platformer world was equal to World 1-1 of Super Mario Bros., but it all looked highly artificial from a perspectival view. I made several simple changes to the level objects to convey the implied dimensionality of the objects in the game based on how they are rendered.

This page references several original Super Mario Bros. design document images that have been shared by Nintendo through the Super Mario Bros. 30th Anniversary Special Interview, Iwata Asks Bonus 1: Ancient Documents from 1985, and an Asahi Shimbun article. These files have been preserved by Gaming Alexandria.

The path "width"


It seems odd to see the character running on a one-block wide pathway. Judging by the early SMB design document shown above, the "ground" layer might have had some visible depth, with receding lines drawn vertically on the screen in a vertical oblique projection (see this previous post for more analysis and comparison to other NES games). There is a sense that there is some foreground space in front of and some background space behind the character on the ground surface.

To mimic this look, I changed the ground elements to be 2 blocks deeps. Floating blocks in the image above do not have the same sort of receding lines, giving the impression that they are not as deep as the ground surface. I left those elements at 1 block deep.

The Warp Pipes


The green warp pipes are clearly intended to be cylinders, as they mimic both sewer pipes (a direct reference to the original Mario Bros.) and planter pots (with piranha plants growing out of them). All of the pipes are 2 blocks wide on the screen and thus, presumably, 2 blocks deep as well. The dithered shading and highlights imply a metal pipe painted green with a shiny paint. The direction of the highlight signifies that the light source is to the left of and behind the "camera."


My pipes are all now 2 block wide cylinders of varying heights. In perspectival view, the circular tops of the cylinders look unusual, but I have found that this is often the case when drawing a circle in 1-point perspective. This is little more than Unity's default perspective camera so far; I still need to add capabilities for other projection methods.

Stairblocks

These blocks are commonly used to make "staircase" patterns in SMB, such as a staircase leading to a platform at the end of a level, just before the flagpole. Unlike bricks and other blocks, stairblocks (so named in the official strategy guide How to Win at Super Mario Bros. (Nintendo, 1987)) appear to have beveled edges, with strong highlights on the upper and left edges and shadows on the lower and right edges.


To match this, I beveled the edges of the stairblocks in my world. The lighting also roughly matches the implied lighting of the original game.

Castle


World 1-1 ends with a two-section castle, over which fireworks may explode if the last digit of your timer is a 1, 3, or 6. The wider base of the castle appears to be a gatehouse with battlements across the top of the wall. Behind the gatehouse there appears to be a narrower and taller tower keep, also with battlements across the top of the wall.


The front face of this castle wall appears to be flat (like a brick wall) as opposed to round (like the warp pipes). The battlements on the far left and right side give the impression that the castle walls are 1/4 block thick. I created a roughly square gatehouse and a smaller, similar keep.

Conclusion

As far as gameplay goes, none of these changes have made any difference in the environment. All of the invisible colliders are exactly the same. In 2-D orthographic projection, the only differences are in lighting and shading: all of the shapes are exactly the same size on the screen. In 3-D perspectival view, this begins to feel more like a fleshed out world, even though many detail elements are missing (such as bushes, hills, and clouds).

Monday, July 22, 2024

Shifting Dimensions in Platformer Spaces

Taxonomy of Virtual Spaces Part II

I continue to work on my platformer game expansion to my interactive Taxonomy of Virtual Spaces project. This overall project is being created to explore the aesthetics of primary geometry methods used when virtual spaces are projected onto a game screen in different visuo-spatial configurations

3D Nintendo Mario by Justin Buovino (2009)

In other words, what is the experience of playing a video game using a different projection method? Artist Justin Buonvino uses Bryce software to create renders of NES game environments as if the games could be played with 3-D perspectival projection (linear perspective) methods. This shows a dimension of depth to the 2-D characters and environment, something that may be closer to the player's mental model of the game even if it isn't expressly shown on the screen.

3D SEN by Geod Studio

3D SEN by Geod Studio is an impressive piece of NES emulator software that can "3Dify" NES games, making them literally playable in a perspectival projection. Developer Tran Vu Truc has painstakingly set screen depth and model data for game objects in many NES games so that Mario's warp pipes are rendered as cylinders, for example. The program even allows users to play their NES games in VR.

Flipping between two views of the same space in Super Paper Mario (Nintendo, 2007)

Even Nintendo toys with this concept as a gameplay feature in the Paper Mario series of games. The titular character can "flip" between dimensions, shifting to a 3-D perspective to overcome obstacles that are a challenge in 2-D perspective.

My project in orthographic projection

My project in 1-point perspective

To start, I've created a replica of World 1-1 from Super Mario Bros. as a default environment for now. I can shift between two different projections at the moment and the controls feel fluid and snappy. The camera settings are set so that the virtual world is framed at the same scale as the original game, as in the screen frames a 15 block high view of the environment (like in SMB). The 16x9 window is obviously much wider than the NES 4x3 aspect ratio, so I change colors on the ground surface every 16 blocks, which would be one screen width on the NES.

Friday, July 19, 2024

Testing the Numbers for Platformer Player Controls

Taxonomy of Virtual Spaces Part II

As detailed in my last post, I used Excel to create formulas to translate Super Mario Bros. physics values (measured in pixels and frames) into metric values (meters and seconds) so that I can use them with my character controller in Unity. It didn't take long to realize that something was wrong.

These make for VERY slow acceleration!

For the acceleration values, I multiplied the calculated distance values by 60 when I meant to multiply them by 60^2 (3600). No wonder my character seemed to get up to speed slowly: I was off by a factor of 60! Once I made that change, the character felt much snappier.

When comparing directly to SMB, my run speed seems slightly fast. In SMB, it takes Mario about 3 seconds to cross one screen width (16 blocks) from a standstill when walking and about 2 seconds when running. My character is covering that distance (16 meters) in a little less time (about 2.6 and 1.6 seconds, respectively), but it is close enough that I can move on and concern myself with other aspects of the controller.

Tuesday, July 16, 2024

Implementing Player Platformer Controls

Taxonomy of Virtual Spaces Part II

After determining the formulas to use to design a player avatar controller for 2-D platformer style gameplay, I need to actually create the code and determine what values to use. How fast should the avatar run? How high should they jump? How far can they jump? What about double-jumping, jump-dash, or other types of movement?

This project is focused on game spatiality, so the character controller is really just a means to an end. The controls should be intuitive, familiar, uncomplicated, and even archetypal. As a start, the obvious choice would be to emulate Super Mario Bros.

Start with Super Mario Physics


A Complete Guide to SMB's Physics Engine by Jdaster64 (link to archive.org)


How fast does Super Mario run? How high does he jump? How far does he jump? This information was collected by Jonathan Aldrich, a.k.a. Jdaster64. Aldrich has spent years meticulously compiling mathematical data about how many Nintendo games function. His A Complete Guide to SMB's Physics Engine document, linked above, gives information on how Super Mario and Luigi move in Super Mario Bros. and the Japanese version of Super Mario Bros. 2 (known in the USA as Super Mario Bros.: The Lost Levels).

I don't know about Aldrich's methodology for acquiring his data and it would be prohibitively difficult to verify every value he's posted. However, I only need a controller that feels authentic to the player, not an emulation with pixel-perfect accuracy. At a cursory examination, his numbers make sense, and I will certainly know from testing if the results are accurate.

Aldrich's distance values are measured using screen units that make sense from the structure of the NES game console. Each different unit of measure is 1/16 the size of the previous unit and each is recorded using a hexadecimal value. One "Block" is 16 pixels across (using the basic 16 x 16 tile size of the NES). One "Pixel" is about 1/240th of the height of the screen and 1/256th of the width of the screen (the NES displays this to fit in the 4:3 aspect ratio of a standard definition television, so the pixels are slightly wider than they are tall).

SMB also tracked fractions of pixels of distance, which allowed for very precise values for acceleration and speed. There are also "Subpixels" (1/16 of a pixel), "Sub-subpixels" (1/256 of a pixel), and even "Sub-sub-subpixels" (1/4096 of a pixel).

Velocity is measured as distance moved per frame, or in 1/60 of a second. Acceleration is the amount of velocity change in 1/60 of a second.

How Many Pixels per Meter?

Converting Aldrich's values to metric

Virtual spaces in the Unity engine are measure in meters, which are typically equal to our own real-world metric system. I reckon that one block should be equal to one meter. In SMB, Mario grows from about 1 block high to about 2 blocks high when becoming Super Mario. 1-meter and 2-meter are both height values within the realm of real-world human possibilities. In addition, it makes things easier to build a world environment where each block is one meter across.

I used Excel to convert blocks and pixels to meters and convert frames to seconds. Now I have the number values to set my velocities, distances, and acceleration values. Now I need a script to give everything structure.

Ultimate 2D Platformer Controller

Fortunately, I found a tutorial video (linked above) for a character controller that uses Unity's new Input System (which is a learning objective for me in this project) and is built using the same formulas I wrote about in my last post. The scripts seem well designed and the results are good so far. The jump values can easily be edited and include options like coyote time and hang time. There is a fair amount of extra functionality I will still need to add (such as different jump heights for walking and running), but this seems like the perfect structure to start with.

UPDATE:

If you follow the Ultimate 2D Platformer Controller tutorial linked above, be sure to watch part 2 of the tutorial here. The first part of the video cleans up and fixes a few bugs from the original video and, if you are interested, shows how to add wall slides, wall jumps, and mid-air dashes.

Monday, July 15, 2024

Designing Platformer Player Controls

Taxonomy of Virtual Spaces Part II

One of the first steps in this project is to code a player avatar controller for 2-D platformer style gameplay, to allow the user to comfortably navigate the virtual environment. This also gives me a chance to use Unity's new Input System for the first time, as I've always used the Input Manager in previous projects.

Now, where to begin? Although I've created a few platformers in my time (like the experimental Super Mario Love (Rowe, 2019)), I've never created one professionally or for broader release. I've studied the game genre extensively and know enough to give my students advice on developing camera systems or how to adjust gravity to not feel "floaty," but this will be a new endeavor for me.


Building a Better Jump

Math for Game Programmers: Building a Better Jump (J. Kyle Pittman, 2016, GDC)

Building a Better Jump by J. Kyle Pittman is a lecture on using physics formulas to plan and design a platformer game controller, part of the "Math for Game Programmers" series of tutorials at the Game Developers Conference.

A common way to create a platformer game is to open the Unity editor, create a player character game object with a rigidbody, and write a script that applies a force on the object in an upward vector when the player presses the space bar. Then, through trial and error, the developer tunes the force value until the object can "jump" to the desired height. This tends to feel floaty, require a lot of iteration, and using Unity's default physics values tends to make it feel like every other Unity game out there.


How high?

Formulas for initial velocity and gravity

Pittman's approach is to remember your college physics formulas! By using the projectile motion vs. gravity formula f(t) = 1/2 gt^2 + v0t + p0 (Blogger is not great for writing formulas!), he shows that the initial velocity (v0)and gravity (g) values can be calculated based on how high you want the character to jump at the apex (h) and how much time you want the character to reach that apex (t). For example, if I want a character to jump 5 meters straight up and take 0.5 seconds to get there, then I should use a jump velocity of 20 m/s and a gravity value of 40 m/s^2 (or about 4 times our Earth's gravity).


How far?

Pittman uses more formulas to determine what lateral velocity (running speed) is needed to clear a certain jump distance. Remember calculating for how far a cannonball can fly before it impacts with the ground? No need to worry about launch angles here. Pittman shows how to calculate what x velocity is needed using time, height, and lateral distance requirements.


Break the Rules

Increase gravity at apex of jump to give the character a sense of weight

The formulas so far create a jump that is a perfect parabola, which unfortunately feels "floaty" and doesn't feel good to play. Here, Pittman quotes Game Feel (Swink, 2008), stating that in Super Mario Bros., the force of gravity triples at the apex of Mario's jump. (Swink: "At the apex of the jump, when velocity reaches 0, gravity is raised artificially by a factor of three, pulling Mario back to the ground with a much greater force than the one he overcame to get airborne in the first place" (2008, pg. 211). This "fast fall" technique makes the player feel "weighty" instead of "floaty." This is a simple technique that I've been teaching to my students for years.


Other modifications

Double jumping

Fast fall, double jumping, and variable-height jumps are all calculated using the same basic methods: use multiple parabolas or partial parabolas to determine the values needed. Pittman's methods give a great foundation for designing a platformer character controller from the ground up by the game's navigational requirements rather than fumbling around by trial and error.

There are still other important aspects of designing a platformer controller that are outside of scope of this lecture, such as coyote time, jump buffering, and hang time. Most of these involve setting timers and allowing the player to input a jump command when their character is not currently "grounded."

Wednesday, July 10, 2024

(Not) Game Genres, pt. 14: John Nesky's 2D Game Solid Boundary Types

Taxonomy of Virtual Spaces

In 2022, John Nesky (Feel Engineer on Journey (Thatgamecompany, 2012)) wrote Twitter thread analyzing various stylistic choices a game artist may make when designing the boundaries of a 2-D game (like many 2-D platformer games). He preserved the thread as a Google document and in pdf format for easy reference.

2D Game Solid Boundary Types by John Nesky

Nesky's analysis of visual styles has some crossover with my current work in analyzing the spatial paradigms of many platformer games. Each example image (see illustration above) features Samus Aran from Super Metroid (Nintendo, 1994) in an environment constructed by Nesky according to these different stylistic techniques. His design study tends to focus on 2-D platformers, but he also shows how the techniques work for other types of games.

2D Game Solid Boundary Types

Nesky defines 10 different art styles used convey the "fourth wall" through which the player views the game environment. The world is often presented as if in an architectural cross-sectional view, using the game's plane of action as the cutting plane. The navigable area of the game's environment is clearly rendered, but the internal structure of that environment (inside the walls, floors, and ceilings) may be abstracted (surface layer), hidden (silhouette), or stylistically presented (wide open spaces).

  1. Modular Blocks
  2. Flat Façade
  3. Jutting Floor
  4. Surface Layer
  5. Deep Shadows
  6. Silhouette
  7. Perspective
  8. Fake Perspective
  9. Wide Open Spaces
  10. Thin Walls

Most of these styles are designed around the capabilities of tile-based environment graphics, like those seen in earlier game consoles like NES, SMS, SNES, and Genesis. These styles do not take foreground or background elements into consideration. They only focus on the environment along the game's plane of action.

Analyzing the Analysis

There are three types of projection methods here that line up with my Taxonomy of Virtual Spaces.

Modular Blocks by John Nesky

Orthographic (Modular Blocks, Flat Façade, Jutting Floor, Surface Layer, Deep Shadows, Silhouette, Wide Open Spaces, Thin Walls)

For my purposes of analyzing spatiality, most of the the styles here are different methods of orthographic projection. The examples above all use a side elevation projection for the environment. Styles like Wide Open Spaces and Jutting Floor do convey a small sense of depth, as if the floors or environmental elements break through space into a foreground layer. However, this projection method tends to convey to the viewer that this is a flat space.

Fake Perspective by John Nesky

Oblique (various) (Fake Perspective)

Nesky's Fake Perspective examples each show the receding lines of the game environment's ground plane (or in the case of The Legend of Zelda: A Link to the Past, the dungeon walls). There are several different projection techniques in these examples.

Yoshi's Island uses a vertical oblique projection, where the side face of the front "wall" is flatly rendered orthogonally and the receding lines of the floor plane are rendered vertically (compare to Yo! Noid on my previous post).

Two games use different oblique projections to render a naive perspective view and a sense of depth: Yoshi's Story (elevation oblique) and Link to the Past (planometric oblique). The receding oblique lines in Yoshi's Story are mirrored left and right, creating an illusion that the lines are converging towards the horizon line. Link to the Past similarly mirrors its oblique lines at the corners of the room to convey a similar illusion. These are not true perspective renderings, though they use some of the same visual cues of a perspective projection.

Nesky's own example is also naive perspective, but the receding lines of the short wall in front of the player avatar appears to be inverted naive perspective: the receding lines diverge into the background instead of converging.

Perspective by John Nesky

Perspectival (usually 1-point) (Perspective)

Curiously, Nesky's first example is a vertical oblique projection and is not truly perspectival at all. This is a paraline projection and receding lines do not coverge in the distance.

Nesky's other Perspective examples are presented in 1-point perspectiveMetroid Dread and Link Between Worlds both use full 3-D environments with the camera perpendicular to the back wall (Metroid) or the floor (Zelda). Both games usually retain a fairly flat view of their environments to mirror the gameplay standards of earlier 2-D games in their respective series. Being fully 3-D environments, the camera is also free to tilt and pivot to more dramatic angles as needed, breaking into 2-point or 3-point perspective.

The other example is Contra III, a game I referenced in my previous post). This scene also uses 1-point perspective, although this Super Nintendo title uses a tiled background and no true 3-D models. Another Twitter user joined Nesky's thread and asked, "Why isn't the Contra III example here Fake Perspective?"

Contrast the receding lines of Contra III and Link to the Past environments

I responded to the question with the above altered screen shots and stated that one can trace the receding lines of the environment to see if they converge. Contra III's lines converge almost perfectly on the center of the screen. Each line is projected at a different angle. In contrast, Link to the Past uses a naive perspective technique with the receding lines of each corner of the environment projected obliquely at about 45° from the horizontal. This offers a convincing sense of depth and is fully in line with the art style of the original Legend of Zelda, but it is not a true 1-point perspective.

Odds and Ends

Nesky also gives several separate games as examples of specific uses of these techniques that I think are worth mentioning as they overlap with my research (especially since these are two of my favorite games).

The Legend of Zelda: A Link to the Past

Nesky notes that Link to the Past uses different projection methods for indoor and outdoor environments. He refers to outdoor projection as orthographic, which I define as orthogonal (a classic "top down" view as opposed to a direct overhead view). He does note the unusual fact that you can see the horizon from the pyramid, something that should be impossible from a planometric projection! This is another example where the conceptual image plane of the background is rendered differently from the environment (see here and here).

Horizontal oblique projection in Flashback

Nesky also notes that Flashback's projection is "angled sideways," or in what is called a horizontal oblique projection. As he states, "This visually preserves precise vertical distances while adding depth to the world. Door frames and platform railings are rendered in front of the avatar." There are many doors in Flashback and this aspect is important to making them look like doors instead of walls.

Conclusion

Nesky is not an expert on the technical details of different projection methods, and he fully admits that is the case. But this was never the point of his study. His study focuses on the specific stylistic choices that game artists use (especially those making tile-based "pixel art" games) to define that invisible fourth wall that is coplanar to the player's screen. He has created another method of defining and grouping games by their aesthetic choices rather than purely by technical or genre classifications and I applaud his work.

Tuesday, July 9, 2024

Digital Project Plans Part II

Taxonomy of Virtual Spaces Part II

Over the summer of 2024, I returning to my prototype digital project to explore the planar geometric projection options that I concluded last summer, named for my Taxonomy of Digital Spaces framework and vocabulary for analyzing the different visuo-spatial configurations of virtual spaces (spatial paradigms) in digital games. 

Link to itch.io prototype build that is playable in browser.

The prototype build simulates the "Filmation" spatial paradigm featured in many popular computer games in the UK in the 1980s, 1990s, and is having something of a resurgence today. The game's projection method can be changed on the fly by pressing the "T" key. 

This year's goal is to incorporate spatial paradigms seen in side scrolling platformers, run-n-gun games, and other influential game genres. These stylistic differences in game graphics can change a player's sense of space as they navigate their avatar through a virtual world.

Take Super Mario Bros. as an example. The graphical presentation is very flat, with every game object and environment tile rendered in an orthographic projection. The virtual space has very little sense of depth and Mario's feet land on the top edge of a ground tile.

FlatSpace_SMB_b.gif
Super Mario Bros. (Nintendo, 1985)

However, surviving design documentation shows that SMB creators had a vertical orthogonal (sometimes called vertical oblique) projection method in mind for the environment. This allows the player to see the top surface of the ground plane as well as give a side view of the ground tiles. Mario's feet would land in the middle of a ground surface tile.

Super Mario Bros. design document.

This design document illustration is similar to the spatial paradigm seen in Yo! Noid, where the Noid's feet land near the middle of the ground surface tiles. The receding lines of the ground surface are rendered vertically in parallel on the screen. This appears to give slightly more of a sense of depth than SMB, but still feels fairly flat to me.

Yo! Noid (Capcom, 1990)

Compare this to Super C with its elevation oblique projection of its environment in the platformer-like stages. The receding lines of the ground plane tiles are rendered in parallel at an oblique angle instead of vertical lines. This technique is also used into the near foreground and background, giving a continuous sense of space for some distance in front of and behind the player character's plane of action. The player avatar appears to be running along a wide surface, not a razor-thin plane.

CavProj_SuperC_b.gif
Super C (Konami, 1988)

All three games above were created for the NES (or Famicom in Japan) game console, but each game had different technical capabilities. SMB uses Nintendo's original NROM memory mapper format with 32KB PRG ROM (game program ROM) and only 8KB CHR ROM ("character" or graphics ROM). Yo! Noid uses the MMC1 memory mapper and 128KB PRG/128KB CHR. Super C uses the MMC3 memory mapper and 128KB PRG/128KB CHR. Noid and Super C could feature more varied graphics in different levels throughout the games while SMB was restricted to a mere 8KB of graphics data for the entire game. It is likely that SMB's CHR ROM size restriction was a factor in not using a more complex projection method for rendering the environment.

The three different techniques shown above are examples of paraline projections (receding lines do not converge in the distance). Compare this to the 1-point perspectival projection used in Contra III, shown below. In this boss fight, the receding lines of the environment converge on a single point on the horizon. The player avatar moves along the ground, walls, and ceiling of the inside of a room that appears to recede into the background, with a giant boss enemy emerging from the rear wall. This game was created for the Super NES (Super Famicom) console, which features a faster processor and built-in graphics modes for simulated 3-D effects that are not present in the earlier NES console.

Contra III: The Alien Wars (Konami, 1992)

I will be adding these spatial paradigms and more to my digital project. The player will be able to switch between these paradigms at will while still exploring the same virtual world.

The final goal of my research is to define game aesthetics by their spatial qualities dealing with the embodied phenomenon of navigating virtual spaces, a cyberkinaesthetic experience. I posit that specific aesthetic trends and styles can be traced through our young art form's history and create a new diachronic "art history" of digital games in the process.

New Game Launched and Summer 2024 Research Review

Summer 2024 Review Taxonomy of Virtual Spaces Click here to play the new Taxonomy of Virtual Spaces - Expanded Edition interactive project...